Posts

Showing posts from June, 2017

Week 5 - Learning Sheet Metal, New Design Structures, System Production Analysis

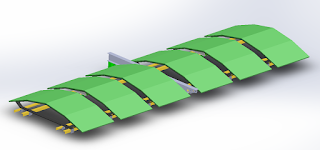
This week we learned how to use sheet metal in SolidWorks. In addition, we analyzed the system production of a solar system that was 2000 m long and 4 panels across. We then compared our results to determine if these results to determine how close they were to an excel spreadsheet setup. It was determined that the results were close enough. The differences are due to different input panels and inverters, as well as other setup parameters. Also, We worked on new designs that would be more visually pleasing to riders, such as arched sheet metal on the side instead of previously proposed flat panels. The top could remain the same as previous designs we have proposed in week 3.

Week 4: Solar Panel Mount Design

Solar Team: Panel Mount Design This week, the solar team worked on coming up with different designs for the solar panel mount. Each member created different designs. The designs were created to follow the following Targets: not drilling into the L-beam, using only sheet metal and aesthetically pleasing. We presented our designs on thursday to the whole Spartan Superway and based on the feedback we got, we have started making improvements to our design. Claude has also shared new files with us, that shows us what kind of designs we should be thinking about.  

Week 3 - Solar Panel Designs

Image
For week 3, we began creating designs for solar panel mounts. These mounts will go on top of our tracks and will meet the following goals: Curved array Easy to access Cover side of tracks We achieved the first two goals by creating a solar panel array that starts at a 10 degree descent with the inner panels and drops to a 20 degree descent with the outer ones. We mounted them to the L beams by using L brackets that will go above and below the beam, allowing us to slide the panels back and forth on the track. We also created a special rack that connect the panels to the brackets, however we will be looking into better methods of creating them. The time and cost of manufacturing them is not desired when compared to other methods such as sheet metal. Figure 1: Completed first design

Week 2 - Solar Team

Image
Week 2: Nahom: We worked on finding the energy per pod. It took 3.68 M Joules of energy to move a pod 4.8 minutes with an average power of 12.786 kilo Watt. We also worked on side track designs. One design idea was covering the side tracks with ads or information board/screen and the other design was to use solar panels.  We learned how to design using sketchup and used JPODs sketchup design to make the side track cover. Colin: For this second week, I began working up designs for our solar panel array and mounting system. Our goal is to bring a curved aesthetic with ease of accessibility. To do this, I created a 5x25 array in a curved design going from 10 degrees to 30 degrees. I also designed a mounting system that uses posts on one side for the PVs to slide into, so that it can be supported by just a single screw on the opposite side. This will allow for easy access and quick swapping from below if needed. I will continue to work on more designs and hopefully we can come up wit

Week 1 - Solar Team Progress

For our first week, we decided to dive into the various reports from the previous solar teams. Through this, we were able to get a feel of how much progress was made and to begin where they left off. We found many reports dating back to 2015 in the INIST archives and Superway Google Drive, however we settled on focusing on Eric Rosenfeld's final report from fall 2016. In this report Eric details the many calculations he has done, such as determining how much energy is required for each pod and how many solar panels would be required to power them. He also included several designs for the mounting and racking setup. Overall, we plan to use this information as a baseline for where to begin, but also found that much of the information will need to be revisited. In the report, Eric uses SunEdison panels for his simulations, however this company has since gone bankrupt. In addition, his curved panel design has the PV panels mounted on the top, requiring a lift to access them. We plan

Assertion-Evidence Method

The Assertion-Evidence Method is a presentation technique that increases the effectiveness of the material by the way it is presented. This method uses assertive titles and pictures/diagrams instead of bullet points and slides full of text to emphasize the points that the presenter speaks. For our first presentation, we utilized the Assertion-Evidence method and found that our titles were not assertive enough. We updated the presentation and hope to be able to better use this method for the next presentation. Our revised presentation can be found by clicking "Keep Reading" in the bottom right.